How to Build a Convolutional Neural Network as a Dummy
Handwritten digits recognition project

When I say CNN, I’m really talking about a Convolutional Neural Network, not the news channel. That said, you don’t need to be an expert in programming or AI to build code that recognizes handwritten digits. That’s what I did.
My purpose for this article is to explain in simple words what it means to create a neural network. I’ll decompose technical terms, show you the 5 main steps that I followed, and explain how this basic project is the foundation for a huge part of the AI revolution.
In theory
In the past, we thought that machines couldn’t surpass human intelligence. Things like recognizing objects with our sense of vision, was reserved for us only. In the XXI century, Artificial Intelligence puts this into question with technologies like Artificial Neural Networks.
Natural Neural Networks would be the ones writing this article right now. In other words, Artificial Neural Networks are inspired by the brain of living creatures, to do what we can do. The difference is that machines learn faster, don’t make the same mistakes twice, and can process enormous amounts of data almost at the same time.
What is an image?
To really understand how CNNs help us classify images and recognize handwritten digits, we need to starting thinking of images in a more mathematical way. The way I see it, images are composed of 2 dimensions and 3 layers. The dimensions are length and width, whereas the layers are red, green, and blue (RGB).
At the same time, images are made up of pixels, which stands for picture element. In each layer, each pixel is a numerical value that indicates how red, green, or blue an image is. Combine these values, and you get an image.

CNNs overview
Classifying images of cats and dogs, or identifying handwritten digits is just the beginning. CNNs are used for face detection in some social media apps, for analysis of medical images, or even self-driving cars. A friend of mine once created a CNN to detect mitochondria!
I already feel like a smart person saying the word convolution. Well, this term refers to a math operation on two functions. This operation produces a third function that is sort of the combination of the two previous functions.
In the context of AI, a convolutional neural network is actually composed of something more than a convolution operation. We can first divide it into 2 phases: feature learning and classification.
At the same time, the first phase is a series of 3 repeated steps: the convolution operation, an activation function, and pooling. While in the second phase we can have any other Machine Learning algorithm able to classify images based on the features that our CNN has learned.

Convolution operation
The convolution means to take an image as an input, and pass a filter of values through it. In this case, the filter is specifying the most important features that we’re looking for in the image. The filter “scans” the image, looking for those coincidences.
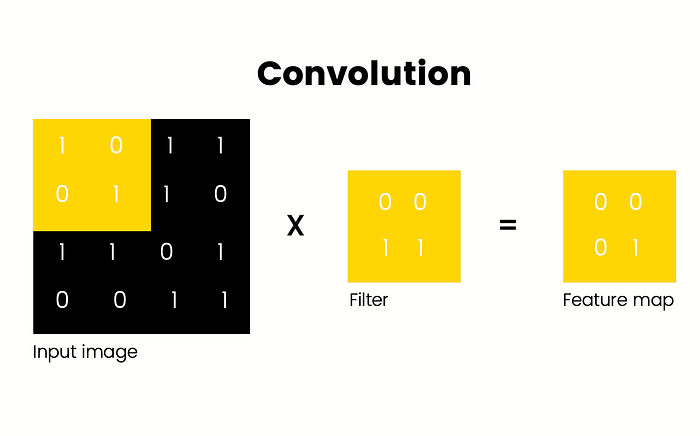
Mathematically, the values of each pixel (or set of pixels) in the input image will be multiplied by those of the filter. The result will be something called a feature map.
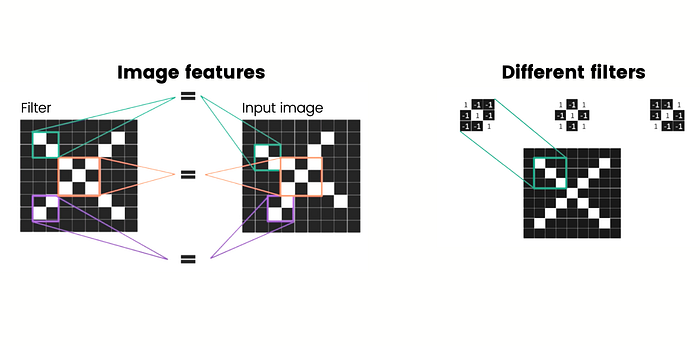
Now, this means that we can have many different filters for many different kinds of features that we’re looking for in an image. The special thing about CNNs is that it will learn what features are the most important ones.
Activation function
The most commonly used one is ReLU, which stands for Rectified Linear Unit. It does something called normalization, which is basically standardizing the numbers we use so there are no negative ones. If it finds a negative number, it turns it into a 0.
Pooling
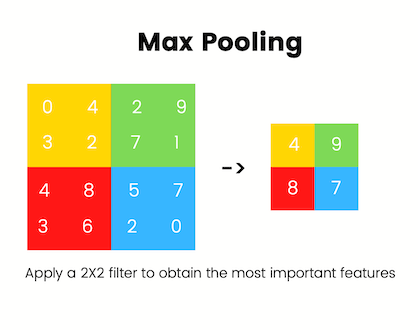
The most common type of pooling used in practice is called max pooling. It applies a 2X2 filter to the image portions that we have and literally keeps the largest value. This helps us reduce the complexity of our values without getting rid of spatial features.
Classification
Interestingly, this part of the CNN process can really be done with any other algorithm that performs classification. Some examples are decision tree classifier, random forest, or logistic regression.
This is when all the previous steps are integrated. All the features that our CNN now knows will be used to classify or detect what the object in the image is.
In practice
Handwritten digit recognition is one of the most basic and popular AI projects for beginners. In this section, I will describe and explain the 5 steps that I followed to build that.
Special thanks to the DeepLearning_by_PhDScholar channel. It’s their tutorial the one I was following to build this project.
#1 Import libraries
First of all, a library is a compilation of code that anyone can apply. As an analogy, we can think that there are different books in this library. We won’t find all of them useful, so we will only import some. Overall, they make things easier.
Tensorflow is a deep learning library, Open CV is useful for opening images, MNIST is a dataset that contains 70,000 images of different handwritten digits. In this case, Sklearn will help us in the data preparation step, matplotlib is useful to have a visual representation of data, numpy allows us to work with arrays of numbers, and we’ll use Keras to create our CNN.
import tensorflow as tf
from sklearn.model_selection import train_test_split
mnist = tf.keras.datasets.mnist
import matplotlib.pyplot as plt
import numpy as np
from tensorflow.keras.models import Sequential
from tensorflow.keras.layers import Dense, Dropout, Activation, Flatten, Conv2D, MaxPooling2D
import cv2
import matplotlib.image as mpimg
#2 Prepare the data
AI is like an Olympic-level athlete: it trains to then compete. So, we need to split our resources accordingly. In this case, our data set will be split into 80% training and 20% testing.
After that, we will normalize the values in our image such that 1 is the maximum value. This makes things easier to process. Next, reshaping means resizing the image to make it more suitable for the convolution operation.
(x_train, y_train), (x_test, y_test) = mnist.load_data()
x_train = tf.keras.utils.normalize(x_train, axis = 1)
x_test = tf.keras.utils.normalize(x_test, axis = 1)
IMG_SIZE = 28
x_trainr = np.array(x_train).reshape(-1, IMG_SIZE, IMG_SIZE, 1)
x_testr = np.array(x_test).reshape(-1, IMG_SIZE, IMG_SIZE, 1)
#3 Create the CNN
We will be able to see in our code how many convolution layers we have, as well as the 3 different steps that these involve: the convolution operation, the relu activation function, and max pooling.
The Conv2D part is creating a convolution layer that has 64 different filters that have a 3x3 size and are applied to our training data set from the second image on. Then, we specify that the activation function to use is relu, and that we’ll use a max pooling with a 2x2 size.
In the first part of the classification network, we want to flatten our 2D values into 1D values. The dense layers are also called hidden layers, which will help us classify those digits.
In the third classification layer, we change the activation function to softmax. It may say that there’s an 80% chance of the digit being 0, and a 0.5% chance of it being 5, a 2% chance of it being 7 and so on.
model = Sequential()#first convolution layer
model.add(Conv2D(64, (3, 3), input_shape = x_trainr.shape[1:]))
model.add(Activation(“relu”))
model.add(MaxPooling2D(pool_size=(2,2)))#second convolution layer
model.add(Conv2D(64, (3, 3)))
model.add(Activation(“relu”))
model.add(MaxPooling2D(pool_size=(2,2)))#third convolution layer
model.add(Conv2D(64, (3, 3)))
model.add(Activation(“relu”))
model.add(MaxPooling2D(pool_size=(2,2)))#classification network 1
model.add(Flatten())
model.add(Dense(64))
model.add(Activation(“relu”))#classification network 2
model.add(Dense(32))
model.add(Activation(“relu”))#classification network 3
model.add(Dense(10))
model.add(Activation(“softmax”))
model.compile(loss="sparse_categorical_crossentropy", optimizer="adam", metrics=["accuracy"])
#4 Train and test with existing data set
The optimizer will improve the accuracy of our model. Now, how does an Olympic-level athlete need to be? They need to be fit! So the fit method will help us train the model, after which we can make predictions with the 20% left of the data set.
model.compile(loss="sparse_categorical_crossentropy",optimizer="adam", metrics=["accuracy"])
model.fit(x_trainr, y_train, epochs = 5, validation_split = 0.3)predictions = model.predict([x_testr])
#5 Test it with your own numbers
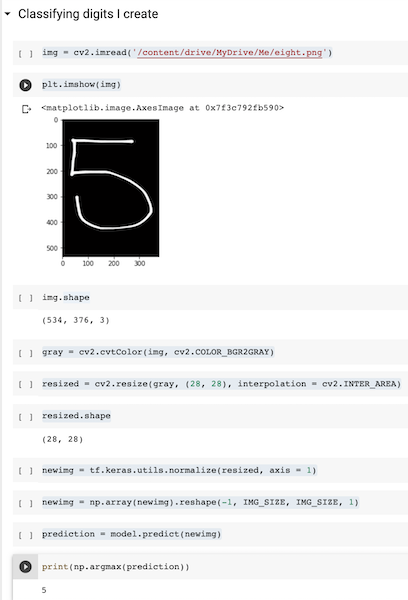
This is the truly exciting part. If we did everything right, that means we will be able to classify completely new handwritten digits using our trained model. For this, I used a digital drawing app to write my numbers. I took a screenshot of them and uploaded them into google drive.
The CV2 library helps us visualize it. Since it is a color image, we had to convert it to a gray one, resize it, and normalize it as we’d done before. Finally, we use our model to predict our handwritten digit.
Is AI hard?
I’ve learned that following these tutorials is incredibly easy. I’d say that you don’t even need to know python, since you could just copy and paste the code. Therefore, understanding that code is what could be challenging.
For me, the next step will be to use this knowledge and apply it to my own ideas. I know that other people have done that in the past, so I like to think that it should be learnable.
Everything around you that you call ‘life’ was made up by people who were no smarter than you — Steve Jobs